 Skip to content
Rough opening for bifold doors chart – Welcome to the world of bifold doors! Whether you’re a seasoned pro or a DIY enthusiast, getting the rough opening right is crucial for a smooth installation. Dive into our comprehensive guide to understand the ins and outs of rough opening dimensions for bifold doors, and set yourself up for success.
From understanding the purpose of rough openings to navigating factors that affect their dimensions, we’ll cover it all. Plus, we’ve got a handy table outlining standard rough opening sizes for various bifold door configurations. Let’s get started!
Rough Opening Dimensions: Rough Opening For Bifold Doors Chart

Rough openings for bifold doors are crucial for ensuring a proper fit and smooth operation. They provide a framework for the door frame and allow for the installation of hardware and weatherstripping.
Standard Rough Opening Dimensions
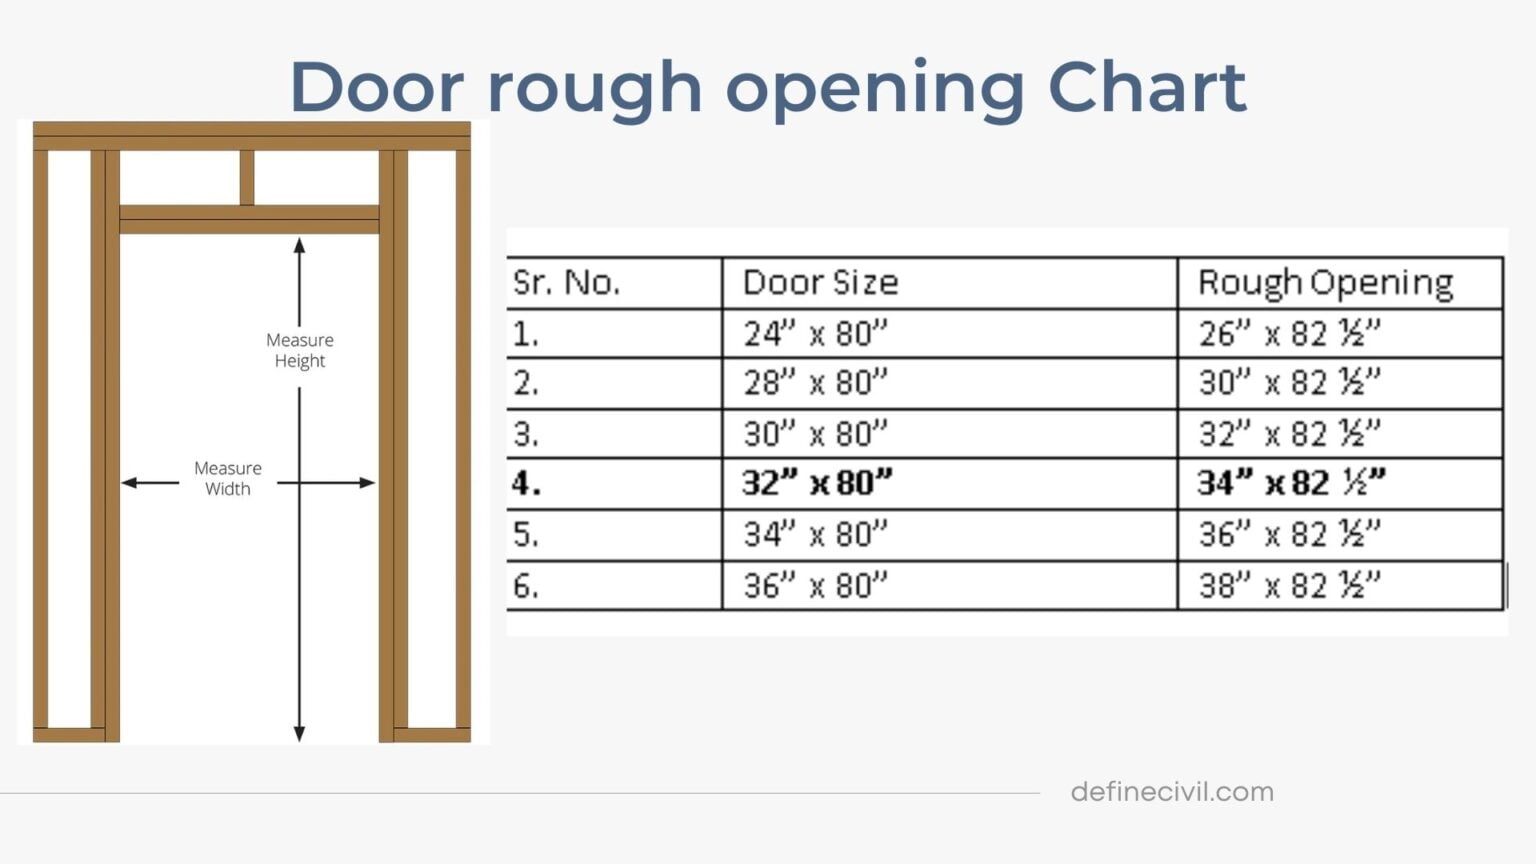
The standard rough opening dimensions for bifold doors vary depending on the door size. Here’s a table outlining the typical dimensions:
| Door Size | Rough Opening Width | Rough Opening Height |
|---|---|---|
| 2-Panel Door | 48 inches | 80 inches |
| 3-Panel Door | 72 inches | 80 inches |
| 4-Panel Door | 96 inches | 80 inches |
| 5-Panel Door | 120 inches | 80 inches |
Factors Affecting Rough Opening Dimensions
Certain factors can influence the rough opening dimensions, including:
- Door Thickness:Thicker doors may require a slightly wider rough opening to accommodate the additional material.
- Hardware Requirements:The type of hardware used, such as hinges and latches, can impact the rough opening dimensions.
Installation Methods

Installing bifold doors in a rough opening involves several key steps: preparing the rough opening, mounting the track, and hanging the doors.
If you’re looking for a detailed guide on rough opening for bifold doors, you can find plenty of resources online. And if you’re planning a special event at Vina Robles, check out their vina robles seating chart to help you plan your seating arrangements.
Once you have the seating chart figured out, you can get back to planning the rest of your event, including the bifold doors.
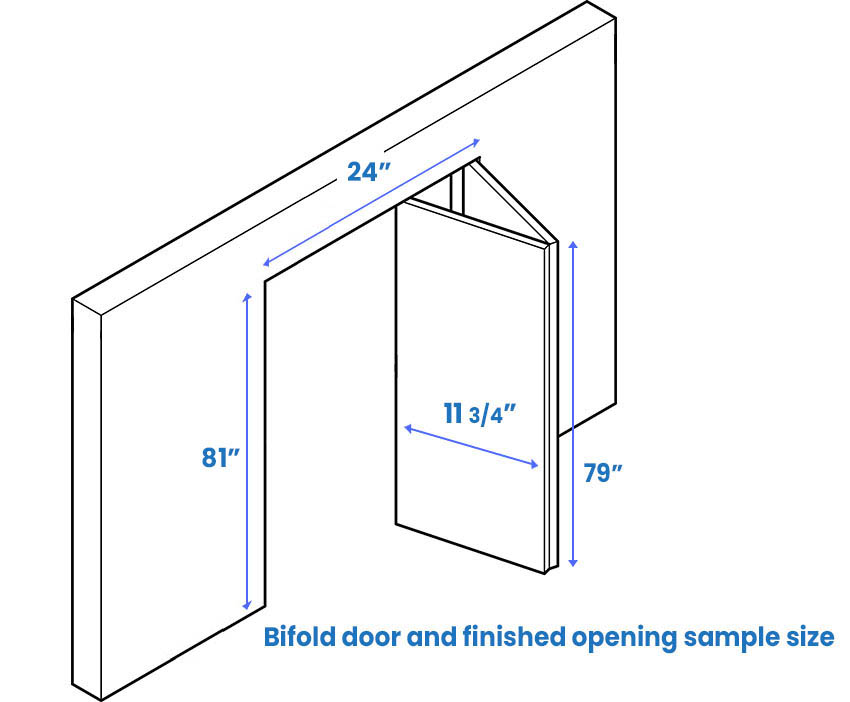
Before beginning, ensure the rough opening is square and level. The opening should be slightly wider and taller than the door frame to allow for adjustment and shimming.
For precise measurements, consult a rough opening for bifold doors chart to determine the exact dimensions needed for the door frame. If you’re also planning to arrange seating for a special event, consider using a masonic center seating chart to ensure optimal seating arrangements.
Returning to the topic of bifold doors, the chart will provide valuable guidance for a seamless installation.
Preparing the Rough Opening
- Inspect the rough opening for any irregularities or obstructions. Remove any nails, screws, or debris.
- If necessary, adjust the opening to make it square and level. Use a level and a framing square to check for accuracy.
- Install a header board across the top of the opening to provide support for the track.
Mounting the Track
- Measure and cut the track to the width of the rough opening.
- Attach the track to the header board using screws or nails. Ensure the track is level and securely fastened.
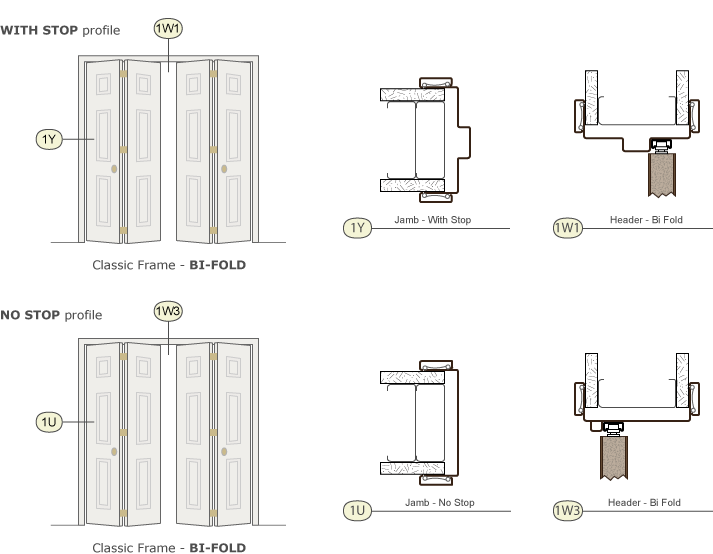
- Install jambs on either side of the opening to support the doors when they are closed.
Hanging the Doors
- Hang the first door on the track, aligning the top and bottom rollers with the track.
- Lift the second door onto the track and connect it to the first door using the provided hinges.
- Adjust the doors to ensure they open and close smoothly and latch securely.
Common Installation Challenges and Solutions
- Doors not opening or closing smoothly:Check the track for any obstructions or misalignment. Adjust the doors or track as needed.
- Doors not latching securely:Adjust the latch mechanism or strike plate to ensure proper alignment.
- Doors not square or level:Adjust the shims behind the doors to level them and square them up.
Hardware Considerations

The choice of hardware components is crucial in ensuring the smooth operation, durability, and security of bifold doors. Various types of hardware are available, each with its own function and suitability for different applications.
The primary hardware components include tracks, rollers, and hinges.
Tracks
Tracks provide the guiding path for the rollers to move along, ensuring the smooth sliding of the door panels. They are typically made of aluminum or steel and come in different sizes and configurations to accommodate various door weights and sizes.
Rollers
Rollers are attached to the bottom of the door panels and glide along the tracks, allowing the door to move effortlessly. They are made of durable materials such as nylon or steel and are designed to withstand heavy loads and repeated use.
Hinges
Hinges connect the door panels to each other and to the frame, allowing them to fold and unfold smoothly. They are typically made of steel or aluminum and are available in various designs and finishes to complement the door’s aesthetics.
Finishing and Trimming

The final step in installing bifold doors is finishing and trimming the rough opening. This involves adding casing, baseboards, and other trim elements to create a seamless and professional-looking finish.
Casing
Casing is the trim that surrounds the door frame. It is typically made of wood or MDF and can be either plain or decorative. To install casing, first measure and cut the pieces to fit around the door frame. Then, nail or glue the casing in place.
Be sure to miter the corners for a clean, finished look.
Baseboards
Baseboards are the trim that runs along the bottom of the wall. They help to hide the gap between the floor and the wall and can also add a decorative touch to the room. To install baseboards, first measure and cut the pieces to fit around the perimeter of the room.
Then, nail or glue the baseboards in place. Be sure to miter the corners for a clean, finished look.
Other Trim Elements, Rough opening for bifold doors chart
In addition to casing and baseboards, there are a number of other trim elements that can be used to finish a bifold door rough opening. These include:
- Crown molding
- Chair rails
- Picture rails
- Wainscoting
These trim elements can be used to add character and style to a room. They can also be used to create a more finished look.
.gallery-container {
display: flex;
flex-wrap: wrap;
gap: 10px;
justify-content: center;
}
.gallery-item {
flex: 0 1 calc(33.33% – 10px); /* Fleksibilitas untuk setiap item galeri */
overflow: hidden; /* Pastikan gambar tidak melebihi batas kotak */
position: relative;
margin-bottom: 20px; /* Margin bawah untuk deskripsi */
}
.gallery-item img {
width: 100%;
height: 200px;
object-fit: cover; /* Gambar akan menutupi area sepenuhnya */
object-position: center; /* Pusatkan gambar */
}
.image-description {
text-align: center; /* Rata tengah deskripsi */
}
@media (max-width: 768px) {
.gallery-item {
flex: 1 1 100%; /* Full width di layar lebih kecil dari 768px */
}
}

Our website has become a go-to destination for people who want to create personalized calendars that meet their unique needs. We offer a wide range of customization options, including the ability to add your own images, logos, and branding. Our users appreciate the flexibility and versatility of our calendars, which can be used for a variety of purposes, including personal, educational, and business use.


![BASD Calendar: Best Online Calendar for [Target Audience/Use Case]](https://lh3.googleusercontent.com/xsJ3CDJGVjb1sE6NU2BFvJuoFDpvPi0m7YLFiMvCLkLY0nTagixlDlFEQZAf7JF8Ijc=h900 "BASD Calendar: Best Online Calendar for [Target Audience/Use Case]")